The Hicathi H44780 LCD is ubiquitious, but it is also quite old technology. It is quie slow (each character takes about 1ms to display) and it requires a lot of pins to connect (8 data + 3 control) having no serial interface. However, it was so popular in the last 30 or so years, that its legacy lives on and it is still the #1 choice for alphanumeric displays.
To offset the difficulty in connecting it, many serial to parallel boards were developed over the years; some converting RS232, acting as a display controller. A few years ago, two boards were introduced, both using I2C to parallel converter chips, also known as I2C port expanders. The most widely used board has a PCF8754T I2C to parallel converter, and many libraries for the Arduino community, using the LiquidCrystal library.
This project demonstrates the use of GCC ARM Embedded toolchain without a GUI. A STM32F103RB is connected to a 2x16 Hitachi H44780 LCD, over a LCD backpack; thtrough I2C. On the STM32F10x, the I2C1 bus is used for communication.
The processor is STM32F103RB. I2C module initialization and use is demonstrated, using the API provided by the STM32F10x_StdPeriph_Lib_V3.5.0 standard periperal libraries.
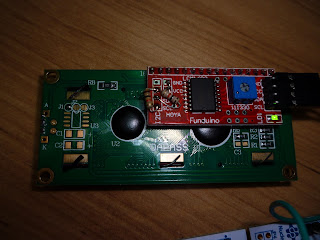
This version of the program is for the red 2x16 LCD Backpack, labeled Funduino. However most of the clones will work as long as they use the PCF8574T I2C to parallel converter chip. Check its address and modify the value of the address definition in main.c (default address is 0x27).
Connections for STM32F103RB Nucleo board (or anything similar):
SDA -> I2C1_SDA (PB7, Morpho CN7, Pin21)
SCL -> I2C1_SCL (PB6, Morpho CN10, Pin17)
5V (Morpho, CN7, Pin18)
GND (Morpho, CN7, Pin20
(STM32F103 I2C1: SCL, SDA are 5V tolerant.)
Connect 10K pull up resistors from SCL and SDA to 5V.
You can build the project as shown my other post. Follow the steps shown there to modify the Makefile to suit your setup, make and burn into your board.
The LiquidCrystal library is by YWROBOT, but was originally written for Arduino. ARM conversion and most of the code here was taken from this post (in Russian. I do not know Russian...).
I used this as one of the first steps when learning how to program STM32F103. Tweaked it, and prepared a project, complete with all files. I am posting it in the hope that someone will benefit from this complete project.
The backpack in action is shown in the photo below. 4 jumper cables are all that are required to make it work, including power. It displays the current value of an internal variable. The heart symbol at the top is user defined.
 | |||
| The LCD backpack in operation. The heart symbol in the first line is user defined. |
The backpack is shown below:
 |
| PCF8574T backpack and STM32F103RB Nucleo board, connected by some jumper wires |
 |
| Closeup of the PCF8574T backpack. |
I have a pile of these Naze32 flight controllers my son has discarded because the gyro broke or whatever. And while not all will work, some still communicate and I've been looking to repurpose them since they are no longer flight worthy, but could be useful. Thanks for sharing your insight. I hope to get some use out of them.
ReplyDelete